ASP.NET MVC Web Application with Two-Factor Authentication
This tutorial explains step by step how you can add two-factor authentication via SMS with the ASPSMS gateway to your ASP.NET MVC project. The sample uses Visual C # and requires a minimum of Visual Studio 2013.
- New ASP.NET-Project
- Add Service Reference: ASPSMS SOAP Web Service
- Make ASPSMS credentials available in Web.config
- Configure ASP.NET Identity SmsService
- Update code of Manage View
- Add a mobile phone number
- Enable Two-Factor Authentication
- Try to login
- New ASP.NET-Project
 In Visual Studio 2013, create a new Visual C# ASP.NET Web application. Select the template MVC and make sure that the authentication is set to "Individual user accounts".
- Add Service Reference: ASPSMS SOAP Web Service
 Copy/Paste Web Service Address and Namespace and add the Service Reference to your project.
Address (copy/paste)
Namespace (copy/paste)

- Make ASPSMS credentials available in Web.config
<appSettings>
    <add key="webpages:Version" value="3.0.0.0" />
    <add key="webpages:Enabled" value="false" />
    <add key="ClientValidationEnabled" value="true" />
    <add key="UnobtrusiveJavaScriptEnabled" value="true" />
    <add key="ASPSMSUSERKEY" value="MYUSERKEY" />
    <add key="ASPSMSPASSWORD" value="MYPASSWORD" />
    <add key="ASPSMSORIGINATOR" value="+41790000000" />
</appSettings>
Make the ASPSMS credentials available to your project by adding the following lines of code to the Web.config:
(copy/paste)
<add key="ASPSMSUSERKEY" value="MYUSERKEY" /> <add key="ASPSMSPASSWORD" value="MYPASSWORD" /> <add key="ASPSMSORIGINATOR" value="+41790000000" />
Replace the placeholders <USERKEY> and <PASSWORD> with userkey and password of your ASPSMS account.
- Configure ASP.NET Identity SmsService
public class SmsService : IIdentityMessageService
{
    public Task SendAsync(IdentityMessage message)
    {
        // Plug in your SMS service here to send a text message.
        var soapSms = new WebApplication2.ASPSMSX2.ASPSMSX2SoapClient("ASPSMSX2Soap");
        soapSms.SendSimpleTextSMS(
            System.Configuration.ConfigurationManager.AppSettings["ASPSMSUSERKEY"],
            System.Configuration.ConfigurationManager.AppSettings["ASPSMSPASSWORD"],
            message.Destination,
            System.Configuration.ConfigurationManager.AppSettings["ASPSMSORIGINATOR"],
            message.Body);
        soapSms.Close();
        return Task.FromResult(0);
    }
}
Insert the code to call the ASPSMS SOAP Web Service into the SmsService class in the file App_Start\IdentityConfig.cs:
(copy/paste)
var soapSms = new WebApplication2.ASPSMSX2.ASPSMSX2SoapClient("ASPSMSX2Soap"); soapSms.SendSimpleTextSMS( System.Configuration.ConfigurationManager.AppSettings["ASPSMSUSERKEY"], System.Configuration.ConfigurationManager.AppSettings["ASPSMSPASSWORD"], message.Destination, System.Configuration.ConfigurationManager.AppSettings["ASPSMSORIGINATOR"], message.Body); soapSms.Close();
- Update code of Manage View
@model WebApplication2.Models.IndexViewModel
@{
    ViewBag.Title = "Manage";
}

<h2>@ViewBag.Title.</h2>

<p class="text-success">@ViewBag.StatusMessage</p>
<div>
    <h4>Change your account settings</h4>
    <hr />
    <dl class="dl-horizontal">
        <dt>Password:</dt>
        <dd>
            [
            @if (Model.HasPassword)
            {
                @Html.ActionLink("Change your password", "ChangePassword")
            }
            else
            {
                @Html.ActionLink("Create", "SetPassword")
            }
            ]
        </dd>
        <dt>External Logins:</dt>
        <dd>
            @Model.Logins.Count [
            @Html.ActionLink("Manage", "ManageLogins") ]
        </dd>
        @*
            Phone Numbers can used as a second factor of verification in a
            two-factor authentication system.

             See <a href="http://go.microsoft.com/fwlink/?LinkId=403804">this article</a>
                for details on setting up this ASP.NET application to support two-factor
                authentication using SMS.

             Uncomment the following block after you have set up two-factor authentication
        *@
        <dt>Phone Number:</dt>
        <dd>
            @(Model.PhoneNumber ?? "None") [
            @if (Model.PhoneNumber != null)
            {
                @Html.ActionLink("Change", "AddPhoneNumber")
                @:  |
                @Html.ActionLink("Remove", "RemovePhoneNumber")
            }
            else
            {
                @Html.ActionLink("Add", "AddPhoneNumber")
            }
            ]
        </dd>
        <dt>Two-Factor Authentication:</dt>
        <dd>
            @if (Model.TwoFactor)
                {
                    using (Html.BeginForm("DisableTwoFactorAuthentication", "Manage",
                    FormMethod.Post, new { @class = "form-horizontal", role = "form" }))
                    {
                        @Html.AntiForgeryToken()
                        <text>Enabled
                        <input type="submit" value="Disable" class="btn btn-link" />
                        </text>
                    }
                }
                else
                {
                    using (Html.BeginForm("EnableTwoFactorAuthentication", "Manage",
                    FormMethod.Post, new { @class = "form-horizontal", role = "form" }))
                    {
                        @Html.AntiForgeryToken()
                        <text>Disabled
                        <input type="submit" value="Enable" class="btn btn-link" />
                        </text>
                    }
                }
        </dd>
    </dl>
</div>
The needed code can either be activated by removing the Razor comment delimiters @* and *@
Or you can simply copy the code below and replace the appropriate section in the file Views\Manage\Index.cshtml:
(copy/paste)
<dt>Phone Number:</dt> <dd> @(Model.PhoneNumber ?? "None") [ @if (Model.PhoneNumber != null) { @Html.ActionLink("Change", "AddPhoneNumber") @: | @Html.ActionLink("Remove", "RemovePhoneNumber") } else { @Html.ActionLink("Add", "AddPhoneNumber") } ] </dd> <dt>Two-Factor Authentication:</dt> <dd> @if (Model.TwoFactor) { using (Html.BeginForm("DisableTwoFactorAuthentication", "Manage", FormMethod.Post, new { @class = "form-horizontal", role = "form" })) { @Html.AntiForgeryToken() <text>Enabled <input type="submit" value="Disable" class="btn btn-link" /> </text> } } else { using (Html.BeginForm("EnableTwoFactorAuthentication", "Manage", FormMethod.Post, new { @class = "form-horizontal", role = "form" })) { @Html.AntiForgeryToken() <text>Disabled <input type="submit" value="Enable" class="btn btn-link" /> </text> } } </dd>
- Add a mobile phone number
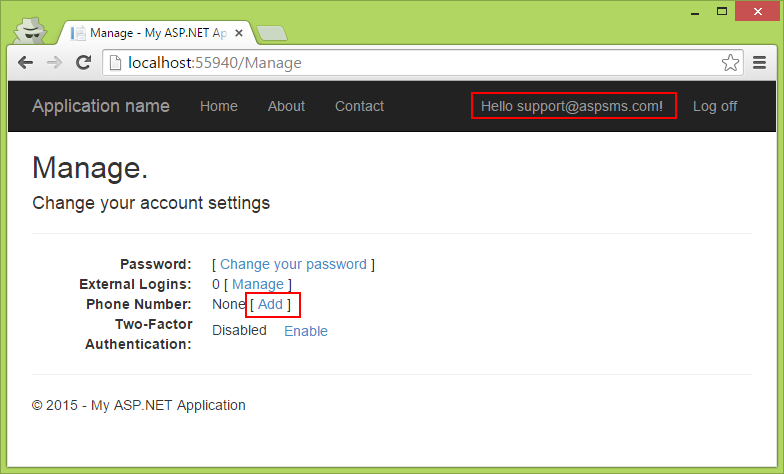 Start your project and create a new account. A mouse click on the selected account email address will take you to the Management page. [Add] your phone number.
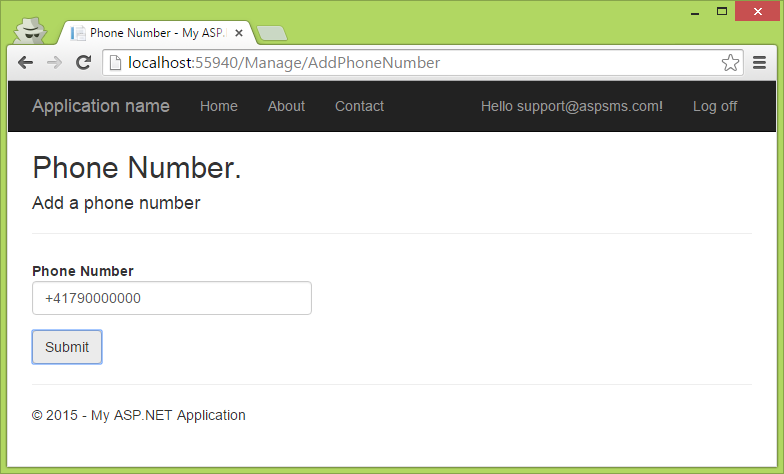 Add your mobile phone number. ASP.NET Identity sends a verification code to that number.
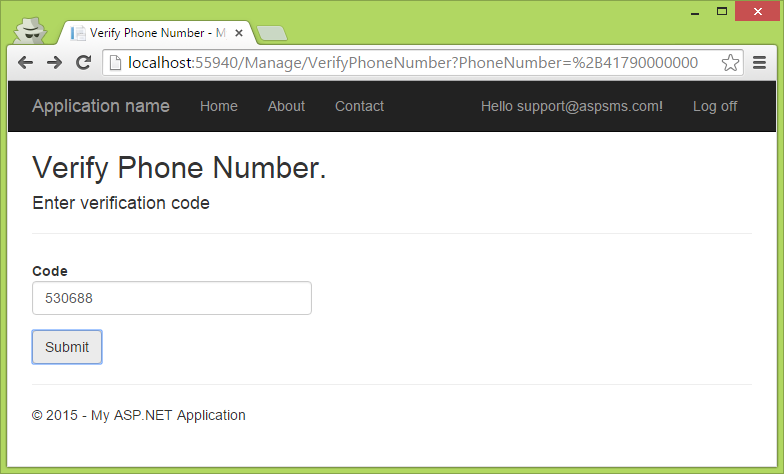 Enter the verification code received.
- Enable Two-Factor Authentication
 Enable two-factor authentication.
- Try to login
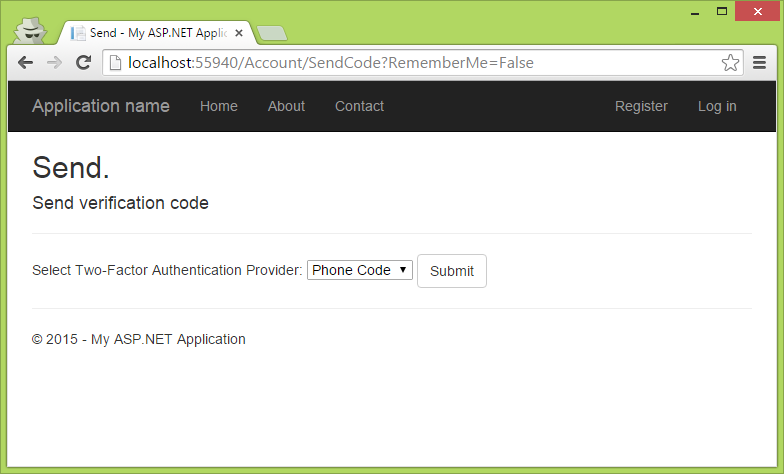 Log off and log on again. You will be prompted to let Send the verification code as a phone code.
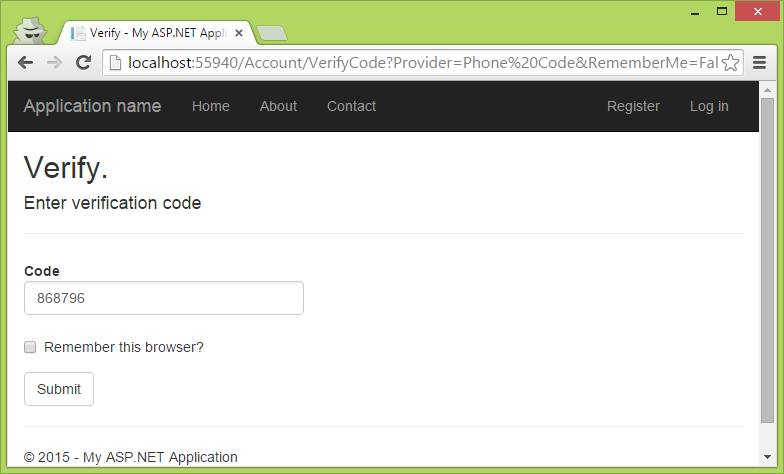 Enter the code which has been sent to your mobile phone and decide whether to "remember this browser" or if your application requires a Two-factor authentication regardless of the used browser.
You got it? Happy Coding :-)
New User Registration
Click here for the ASPSMS new user registration.
Have you already registered? Log in with your user e-mail address and password.
| Factsheets | |
|---|---|
| Purpose and business examples | |
| SMS tools for End Users | |
|---|---|
| Name | Pricing |
| SMS Blaster Winlog | free |
| Microsoft Office Outlook 2013-2016: Email to SMS | free |
| Microsoft Office Outlook 2010 Mobile Service | free |
| Microsoft Office Outlook 2007 Mobile Service | free |
| SMSBLASTER web edition | free |
| SMS Blaster Windows Edition | free |
| SMS touch for iPhone and iPod touch | Shareware |
| ECO-SMS - Ökologische SMS! | Shareware |
| Cybersystems mscrmSMS | see price list for details |
| Jabber-Client Chatopus for Palm OS | small one-time payment |
| delight Software GmbH | see price list for details |
| ASPSMS Widget for Mac | free |
| SMS scripts and interfaces for developers | |
|---|---|
| Name | Pricing |
| ASPSMS Dot Net Assembly on NuGet | free |
| ASPSMS JSON API (REST) | free |
| C# Microsoft ASP.NET Identity MVC (for SOAP) | free |
| Node.js interface for ASPSMS | free |
| PHP Class for ASPSMS SOAP web service | free |
| aspsms.dll (Active-X) | free |
| SOAP Web Service | free |
| XML-Interface | free |
| ASPSMS SMTP Interface | free |
| VBscript Class (ASP) | free |
| HTTP | free |
| PHP - Python - C# - Java | free |
| Jabber to SMS for Server Admins | free (open source) |
| SMS Blaster Visual Basic Source Code | free |
| ASPTOKEN | free |
| Network coverage | |
|---|---|
| Supported networks around the world |


